So we recently bought two Brompton´s for a September bike trip to Cuba. To my surprise I found that as of 2014? New Bromptons no longer come with Easy wheels as standard, even if you buy the rear rack. Instead you get these sorry looking circular plastic bits with no bearings and your 2K$ Brompton rolls around caveman-like. To add one more insult the only authorized dealer in Mexico doesn´t carry easy wheels, so you have to order through amazon or a third party all of which are ridiculously expensive + shipping.
Enter Google. I had no idea but apparently skate wheels are a great alternative which is what we have opted for and I will be posting as to how this mod works out for us.
My first stop was a great article by David from IamStuffed which you can find here. As David mentions it MIGHT seem like an obvious HowTo but it is one I am sure all of us interested in the topic research heavily before figuring out what to head out to Lowe´s for. There´s a few more great posts out there in the forums but most of them are old… so here is my versión from all my research…
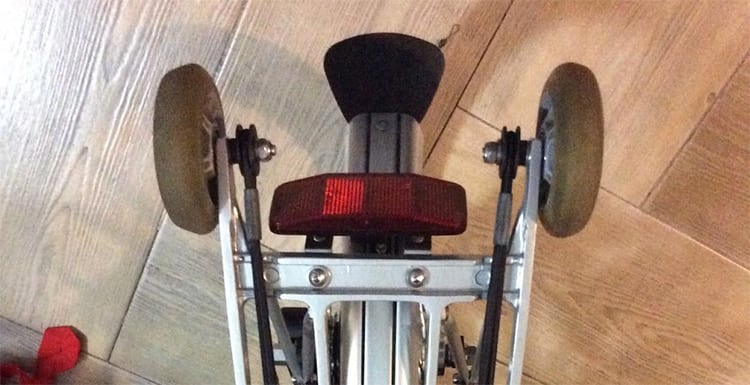
Before starting here is the setup; We have two Bromptons M6R 2016 models. For this trial run I found my old set of Roller Blade Wheels which for some reason I still had (and found) in a box laying around in my parents garage. Its a set of 8 well worn 78mm wheels with ABEC 7 bearings.
Important note: 2016 models have 6mm screws all around. From what I found, previous models had 6mm screws in front and 5mm in back.
The only thing I purchased from Home Depot was;
- 32 SAE 1/4inch washers
- 3.2feet (1meter) 1/4inch hose (which was more than enough, you only need about 10cm). Basically you need any filler which is 8mm on the outside and 6mm on the inside. This hose in particular from Home Depot did just fine.
Everything else you can reuse from your Brompton.
Step 1
So David and others bought longer screws because they used both bearings on the Roller Skate wheels. The screws on the Brompton are not long enough to go through both bearings AND the frame. I found a) longer screws with the same thread are ridiculously difficult to find and b) you don’t really need them.
The original Brompton wheels are wider than one bearing but much narrower than both bearings plus the space in between. My reasoning was that rollerblade wheels are designed to hold all 180lbs of me distributed around (best case) 16 bearings. My bike needed to support a fraction of that weight and it could probably very well do it on 4 bearings. All I needed to do was make up for the small width difference between the original Brompton wheel. This is where the washers come in which also hold up the bearing and everything in place.
The only other important point to consider prior to starting is that the Brompton 6mm screw is 2mm narrower than the standard bearings which are 8mm wide. You need to make up for these 2mm or else your bearing is bouncing around the screw probably causing unnecessary stress. In various forums you´ll find people go around this mostly by finding some sort of filling which is 8mm on the outside and 6 on the inside thereby allowing enough space for the bearing on the outside and a snug fit for the screw on the inside. By some miracle, Home Depot carried such a bizarre configuration by way of a plastic PBC hose sold for cents by the meter. It is 8mm on the outside and just about 6mm on the inside (the plastic is maleable enough for the screw to leave groove marks).
Step 2
So, step 2 is basically just to cut the PBC plastic tube as wide as the bearing. Insert the 4 washers plus the plastic filler. The washers will hold the bearing in place on the exterior side (actually the rollerblade wheels usually have a stop which would prevent the washer from falling out the other end, but the washers help in such a job just fine).
Make sure both are as wide as the original Brompton bearing.
After this your pretty much good to go as far as screwing everything back into place on your Brompton.
Step 3
Step 3 is easiest. As far as your Brompton is concerned, nothing happened. The space between is the same as the original Brompton wheel and everything else remains the same. All you need to do is remember how the original Brompton washers where placed; usually one in between each joint.
The rear wheels are a tiny bit trickier due to the elastic bands… but it is not that much different; the original Brompton wheels are the same width (1 bearing + 4 washers). Just remember the way the original washers are set up so they end up the same way.
Installing Skate Wheels on a Brompton Tips
This whole DIY setup should take you no more than an hour once you have a successful trip to Lowe´s of Home Depot. I think the hardest part is having luck and finding a filler for the screw on your first visit to the hardware store. (Washers are a synch and you will probably have no trouble finding these in the right size).
Its an easy upgrade to your Brompton and much muuuuch cheaper than opting for the easy wheels.
I´ll have updates on how these wheels perform, but in-kitchen tests show they are a complete success.
Here are a few more pics of various angles and parts.
